When you repair your composite kayak, it's important that you use the correct materials, or…
Rudder Cord – Inspection and Replacement
Rudders are a critical part of some sit-on-tops, many sea kayaks and most racing kayaks. It’s easy to forget how important they are until they stop working. In many cases, it’s easy to spot a potential issue and then prevent it from happening. Read on and learn what to look for when inspecting the rudder cord on a kayak.
While different kayaks and different brands may have slightly different ways their rudders work, the general principle is the same; rudder controls (usually foot pedals or maybe a tiller bar) are connected to the rudder via a length of rudder cord or cable. We will focus on foot pedals in this article, but a tiller bar system works in a similar way. Movement in one foot pedal pulls the rudder cord on one side, which then moves the rudder. It’s fairly simple and works well until the rudder cord snaps……
Rudder cord / cable can be made from a few different materials.
- Stainless steel cable is strong and very resistant to wear. You can expect it to last a very long time. As it is not flexible, crimps must be used to form a loop in the cable.
- Double braid cord. This has an outer sheath of an abrasion resistant material, and a strong, low stretch inner material. The inner material will be a material such as Spectra, Dyneema or UHMWPE (Ultra High Molecular Weight Polyethylene).
- Dyneema or similar material, which is made with a single braid.
Inspect for Damage
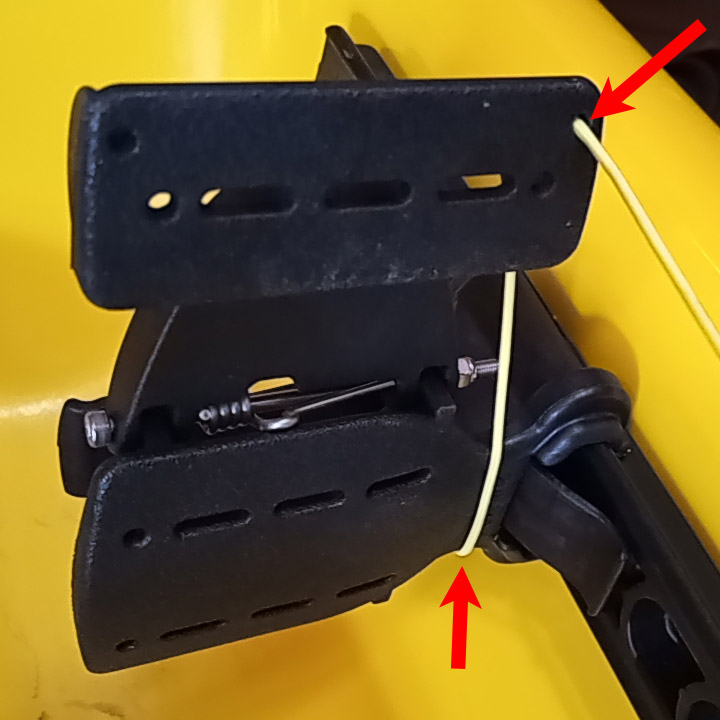
The first place the rudder cord will wear is at a point where it rubs on something and will eventually chafe through. This will commonly be where it runs through foot pedals / steering flaps, where it is attached to a rudder or where it enters / exits the kayak. Spotting wear on a double braid rudder cord is easy; look for wear in the sheath. The core will be a different colour, and if you can see the core it’s a good idea to replace. The easiest way to inspect the cord is to move your foot pedals backwards and inspect the cord without the pedal in the way.

If you have stainless steel cable, then chaffing is not such an issue. Instead, look for places where the cable flexes, which can cause fatigue in the cable. Typically, you might see a few strands of broken cable sticking out. The main location to look for wear is the end of the cable, which are often finished in a loop. Look at the cable right beside the crimp, and check to see that all strands are intact still.

Also take a look at the housing the rudder cord or cable passes through. This should be one continuous length on each side. If it has broken then this can be replaced at the same time the rudder cable / cord is replaced. If you own a sit-on-top, inspecting the housing can be difficult or even impossible.
Please note. The instructions below are all based on a kayak with a continuous housing. Any kayak that has damaged housing, or doesn’t have a continuous length will involve additional steps, which are not covered in this article.

If you see visible wear, it’s time to replace your rudder cable. Replacement consists of removing all the old rudder cord / cable and replacing with new. If you are not too familiar with the way your rudder cord is setup, grab a few photos before you remove anything.
Have a read below for a rundown on how to replace stainless steel rudder cable and rudder cord.
How to replace stainless steel rudder cable

Tools and parts required
- Stainless steel rudder cable the same diameter as the original cable
- Crimps to suit the diameter of cable you are using
- Thimble (not all setups use a thimble)
- Wire cutters
- Crimping tool (a good quality tool will make your job much easier)
- Heat shrink to cover the crimp (optional)

- Most rudder setups have the stainless cable running from just forward of the seat back to the rudder.
- Put a length of masking tape inside the kayak to mark where the cable starts.

- Remove the old cable. This is where a good pair of cable cutters / side cutters are handy.
- Feed the new cable into the housing tube from whichever end is the easiest to access.

- At the footrest end, make a loop in the cable to match what was there originally. If a thimble was used, you might be able to reuse the thimble again. Or use a new one. If you plan on covering the crimp with heat shrink, make sure the heat shrink is on the rudder cable before you add the crimp.

- The cable is now ready to be crimped at the rudder end
- Position the loop / thimble so that it lines up with the rudder (or with a shackle)
- Have a helper hold the foot pedal end of the cable to that it lines up with the masking tape.

- Attach the cable to the rudder using the same method as was originally used.

- If you haven’t do so already, inspect the section forward of the rudder cable. This may consist of rudder cord, or an adjustable webbing strap. If a replacement is required, read on…..
How to replace rudder cord

- The process is very similar to that used to replace stainless steel cable, expect it’s overall less complicated
- If the cord is in two sections, with an adjuster / join in the middle, mark this point with masking tape
- Remove the existing cord

- Feed the new cord through
- Replicate the original set up to secure the cord at the foot rest end. The original knots are likely to be half hitches or a sliding knot (such as a scaffold knot).

- Have a helper hold the cord in line with the masking tape in the cockpit
- Tie the cord at the rudder end. Replicate the original set up

If your kayak has no provision for fine tuning the tension in each of the lengths of rudder cord, now is the time to ensure everything is set up properly. Give a firm push on both rudder pedals at the same time. This will pull the knots tight. With the rudder in the straight ahead position, check that each of the steering flaps is in the correct position and that the two flaps are even. Adjust and repeat these steps until you are happy with the setup.
How to refit rudder cord to rudder pedals

Many kayaks have the end of the rudder cord attached to the far end of the track. Accessing this can be a challenge in many kayaks. The easiest way is often to remove the track, fit the new cord and then refit the track.

Remove the screws that hold the tracks in place. Some kayaks will have screws that are accessed from the outside of the hull, while others will be accessed from inside the cockpit.

Once you have the foot rest out of the kayak, you can remove the cord, replace with new and then tie a knot to secure the cord to the track.

Refit the foot rest to your kayak. A helper can make things much easier. Tip: Don’t tighten the screws until all the screws have been threaded into the rail. You might find the screws don’t quite line up as expected, and having a small amount of movement can help to get each screw lined up.
Useful Tips
- If you need to undo any screws on the foot rail (or anywhere else on the kayak), make sure you use the correct tool. Screws could require a driver to suit pozi, hex, square or even torx fittings.
- Once you have completed the job, check that everything is suitably tightened. Check the rudder has full movement left and right. Give the rudder pedals a solid push (push both pedals at once). Check that the steering flaps are evenly angled when the rudder is pointing straight. Once on the water, check everything is working before you find yourself committed and requiring the rudder.
- Rudder cord may stretch slightly during the initial use. Check the set up after you have done a paddle.
Related Posts